Home Office Install Guide
Bigleaf Router Configuration
Home Office Install
For use with BLR-108 and BLR-112 routers
Let's get started
The router shipped to you is pre-configured and ready for use, so you can install it right away.
If you have any trouble connecting or you think there may be a problem with your Bigleaf service, call us so we can help you immediately.
Tech Support: (888) 244-3133
General questions, helpful information, and Chat Support: Bigleaf Help Center
Email: Support@bigleaf.net
Step 1 – Prepare for setup
Have the Bigleaf Configuration Details card available
You received a Configuration Details card in the Bigleaf box that includes the information needed for setting up your Bigleaf router. Have this card close by when connecting your router.
Gather network cables
You will need one Ethernet cable (CAT5E or CAT6) for each Internet Service Provider (ISP) modem/router, plus one additional cable. For instance, if you have 2 ISP modems or routers (or access points, switches or a firewall) that you plan to use, you will need at least 3 Ethernet cables.
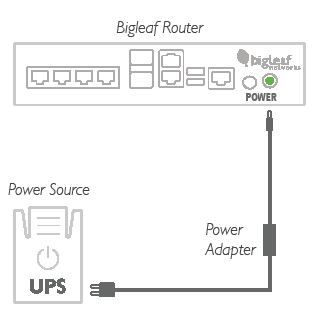
Plan your power source
The Bigleaf router should be connected to an Uninterruptible Power Supply (UPS).
Verify access to your firewall or router
Verify that you have access to edit your router configuration. You may be required to make changes depending on your Bigleaf service plan and if you have a modem/router combo device. If you are unsure how to access your router settings, refer to the user guide provided with the device, or call your Internet Service Provider.
Step 2 - Consider IP-related changes (Static Public IP Add-on)
The following considerations apply only if you have static public IPs. If you do not, skip this step. If you are unsure if you have a static public IP add-on, consult your IT Admin or Bigleaf order confirmation email. Or contact Bigleaf Support at (888) 244-3133.
DNS records
Do you have DNS records pointing at your existing ISP IP addresses? If so, you will need to plan to update those to your new Bigleaf IP addresses during the router install.
To do:
A day or two before the install, lower the TTL for those records to a small value like 10 minutes to ensure a quick transition.
Mail server
Are you hosting a mail server on-site? If so, Bigleaf will need to set up a reverse-DNS PTR record for the server. To set this up, email support@bigleaf.net with:
- The Bigleaf IP address that you will use for your mail server
- The full hostname of the mail server
VPNs
Do you have any VPNs, or other network resources that are statically configured with WAN IP addresses? If so, you will update these after the router is connected.
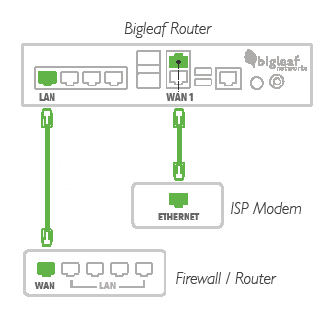
Step 3 - Connect the Bigleaf router
The Bigleaf router requires connections to your Internet circuits and your network.
Important: You must disable wifi on the ISP’s router and use a different DHCP device (access point or firewall) for the home wifi method.
If you’re using Bigleaf Wireless Connect and need to connect the LTE device, see the Wireless Connect page.
- Disable wifi on the ISP’s modem before connecting the Bigleaf router.
- Using Ethernet cables, plug each ISP circuit into the corresponding Bigleaf router WAN port.
- Connect your DHCP access device (access point or firewall) into the Bigleaf router LAN port.
- Connect the Bigleaf power adapter to the port on the front of the router. Then plug the power adapter into a power source.
The router powers on automatically and the power light turns on.
Step 4 - Configure the firewall or router (Static Public IP Add-on)
The following considerations apply only if you have static public IPs. If you do not, skip this step.
To connect your network to the Bigleaf service, re-configure your firewall or router with your new Bigleaf IP address information.
- Log in to your firewall or router interface and navigate to the page where you set the WAN or Internet IP address.
- Input the information for the internet connection.
- Save and apply the new configuration. You may need to reboot the device.
Step 5 - Test connection and make final updates
The installation is complete. Open a web browser and browse to some pages, connect to your VPN, test a streaming device to make sure everything is connected and working properly.
To-do:
If things look good, make any IP-related updates identified in Step 2, such as DNS, Mail Server, or VPN settings based on your new Bigleaf IP addresses.
If you have any issues or questions, contact Bigleaf support for help:
Tech Support: (888) 244-3133
General questions, helpful information, and Chat Support: Bigleaf Help Center
Email: Support@biglef.net
Step 6 - Configuration
Update your provider’s speeds in Bigleaf Cloud Connect to ensure that our proprietary Quality of Service algorithms will appropriately prioritize your traffic. The following steps can only be completed if you are an administrator of the site you are configuring. If your service is being managed by someone else or your company’s IT, provide them with the needed information shown.
- Log into Bigleaf Cloud Connect with Admin credentials, app.bigleaf.net
- If you haven’t received an email to set up your password, email homesupport@bigleaf.net or call support at (844) 464-6682 (6am-5pm PT) to have the email re-sent.
- On the main dashboard page (Sites Overview) select, your site and on the Sites page, select Site configuration.
- On the Configuration page, select Edit.
- Scroll down to the Circuits section, update the Download Speed, Upload Speed, and Type if necessary. If you don’t know your provider speeds or circuit type, contact your ISP.

- Select Save to save the site configuration and exit the configuration view.
- Take some time to explore the different pages and settings in Bigleaf Cloud Connect.
If you have any issues or questions, contact Bigleaf support for help:
Tech Support: (888) 244-3133
General questions, helpful information, and Chat Support: Bigleaf Help Center
Email: Support@bigleaf.net
Help Center
Find installation and setup guides, answers to frequently asked questions, and troubleshooting tips.