Premier Install
Bigleaf Router Configuration
Premier Install Instructions
For use with BLR-108 and BLR-112 routers
Let's get started
Follow these steps to configure, provision, and install a Bigleaf router. If you have any problems or questions, reach out to Support.
Tech Support: (888) 244-3133
General questions, helpful information, and Chat Support: Bigleaf Help Center
Email: Support@bigleaf.net
Step 1 - Consider IP-related changes
DNS records
Do you have DNS records pointing at your existing ISP IP addresses? If so, you will need to plan to update those to your new Bigleaf IP addresses during the router install.
To do:
A day or two before the install, lower the TTL for those records to a small value like 10 minutes to ensure a quick transition.
Mail server
Are you hosting a mail server on-site? If so, Bigleaf will need to set up a reverse-DNS PTR record for the server. To set this up, email support@bigleaf.net with:
- The Bigleaf IP address for the mail server
- The full hostname of the mail server
VPNs
Do you have any VPNs, or other network resources that are statically configured with WAN IP addresses? If so, you will update these after the router is connected.
Step 2 - Configure the Bigleaf routers
Add a company or site
- Log into Bigleaf Cloud Connect with Admin credentials, app.bigleaf.net
- On the main dashboard page (Sites Overview) select Add new site. You can add the site to an existing company or a new one.
- Enter the site information. For the site name, if this is a single site, most partners enter Main or HQ.
- In the Service Tier dropdown, select Premier.
- Select the Service Plan for the site. Typically this is the combined plan for the total ISP bandwidth speeds.
- Select Add site.
- Select to go to the Site Configuration page.
Configuration page settings
- If the page is not already in Edit mode, click Edit in the upper right corner.
- In the Circuits section, select Add new to create a WAN circuit and enter the information. In the WAN Name field, we recommend entering the ISP company name, for example, Comcast. You can enter up to 4 WAN circuits.
Note: The Upload and Download speeds are the paid speeds from the ISP.
To add a Wireless Connect circuit and service plan, see the Wireless Connect page. - In the Tunnel Endpoints section, select the Primary POP that is closest to the service address of your customer. Then select the second closest location for Secondary POP.
- In the LAN Networks section, select Add new to enter your LAN information. For the POP, select the same Primary POP that you did above and then select your Block Size.
- In the Primary CPE Routers section, select Add new, and then select the first router you’re setting up, verifying by serial number.
- In the High Availability CPE Routers section, select Add new, and then select the second router you’re setting up, verifying by serial number.
- Select Save located at the top right corner of the page.
Download the router configuration
We’ve made downloading the latest router configuration easy. All you need is a reliable DHCP network connection.
- Connect a cable from the AUX Port on the customer’s Bigleaf router to a DHCP-enabled connection (firewall, switch, or other DHCP-enabled device). For security purposes, make sure your Bigleaf router is not behind a DMZ.
- Using the provided power cable, plug the Bigleaf router into an Uninterrupted Power Supply (UPS). Do not plug directly into a wall outlet. The router automatically powers on and begins the configuration download. The router beeps once and displays a green power light when it’s fully operational.
You may see on the Primary CPE Routers section that the router’s Firmware Version is Out of date. If you see this, no action is needed, the firmware will update automatically. (This can take a few minutes.)

When the firmware update is complete, the Firmware Version changes to Up to date.

Provision the routers
Scroll to the top of the Configuration page for the site you’re setting up, and select Provision Site.
To see the IP information for the site, select Print configuration. Save this information, you’ll need it when you install the router at a customer site.

Step 3 - Install the Bigleaf router at a customer site
Get to know the Bigleaf routers
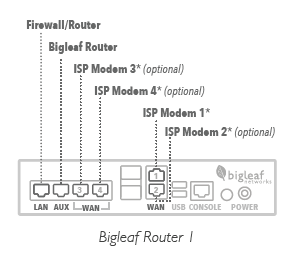
This overview shows the general connection topology for the Bigleaf router models BLR-108 and BLR-112. Below are step-by-step instructions for all hardware connections.
Note: If you’re using Bigleaf Wireless Connect and need to connect the LTE device, see the Wireless Connect page.
Each port on a Bigleaf router is designated for a specific device, as displayed in the illustration.
BLR-108
BLR-112
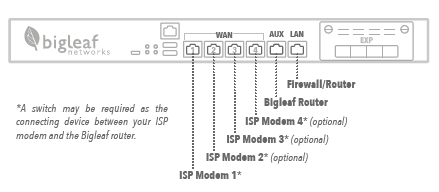
*A switch may be required as the connecting device between your ISP modem and the Bigleaf router.
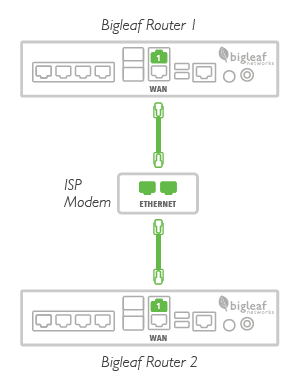
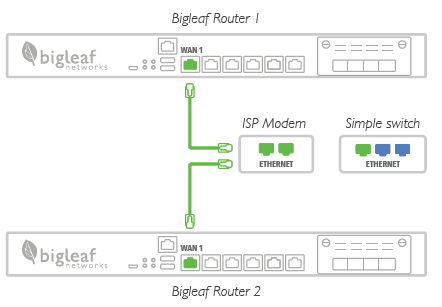
Step 4 - Connect ISP modem(s) to Bigleaf routers
Do not connect the Bigleaf power supply until all other connections have been made.
- Plug each ISP circuit into the configured WAN port on Bigleaf Router 1.
- Plug each ISP circuit into the configured WAN port on Bigleaf Router 2.
BLR-108
BLR-112
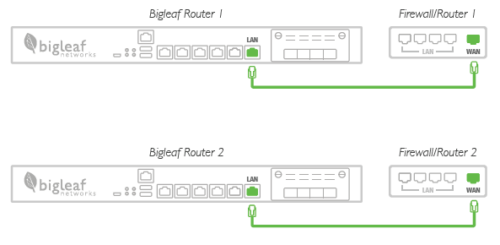
Step 5 - Connect firewalls to the Bigleaf routers
Connect the LAN port on Bigleaf Router 1 to the WAN port on Firewall/Router 1. Then connect the LAN port on Bigleaf Router 2 to the WAN port on Firewall/Router 2.
BLR-108
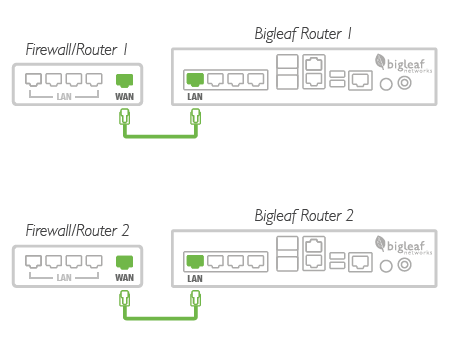
BLR-112
Step 6 - Connect the Bigleaf routers together
Connect the AUX port on Bigleaf Router 1 to the AUX port on Bigleaf Router 2.
BLR-108
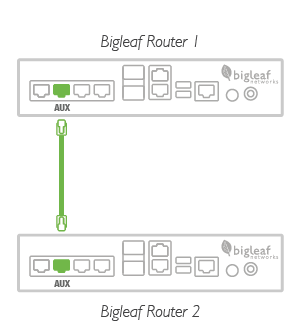
BLR-112

Step 7 - Connect the routers to a power source
Using the ports on the back of the devices, connect the Bigleaf routers to a power source. The Bigleaf router should be connected to an Uninterruptible Power Supply (UPS).
Step 8 - Configure the customer's firewall or router
To connect the customer’s network to the Bigleaf service, re-configure the firewall or router with the new Bigleaf IP address information.
- Log in to your firewall or router interface and navigate to the page where you set the WAN or internet IP address information.
- Input the information for the internet connection:
IP address
Subnet Mask
Default Gateway/Route
DNS1
DNS2 - Update any firewall policies, such as VPN, port forwarding, or NAT rules to use the new IP address information.
- Save and apply the new configuration. You may need to reboot the device.
Test connection and make final updates
The installation is complete. Open a web browser and browse to some pages to make sure everything is connected and working properly.
To-do:
If things look good, make any IP-related updates identified in Step 1, such as DNS, Mail Server, or VPN settings based on your new Bigleaf IP addresses.
If you have any issues or questions, contact Bigleaf support for help:
Tech Support: (888) 244-3133
General questions, helpful information, and Chat Support: Bigleaf Help Center
Email: Support@bigleaf.net
Help Center
Find installation and setup guides, answers to frequently asked questions, and troubleshooting tips.